Taking good landscape photos can be challenging. How often have you seen
a beautiful scene, but when you photograph it with your iPhone the
image doesn’t do it justice? And how many of us actually live in
stunning scenery anyway? Luckily there are some simple yet highly
effective techniques for creating amazing landscape photos even in the
most ordinary locations. In this tutorial you’ll discover ten secrets
for capturing breathtaking landscape pictures with your iPhone, no
matter where you live.

But you don’t need to live in areas of stunning natural beauty to take great landscape photos. No matter where you are, if you take the time to explore your region you’ll find some excellent opportunities for taking amazing landscape photos with your iPhone.
 Although In the City area of Tennenssee, there are lots of
areas surrounding the city where I can find natural landscapes to
photograph.
Although In the City area of Tennenssee, there are lots of
areas surrounding the city where I can find natural landscapes to
photograph.
Even if you live in the countryside, you’ll probably need to do some exploring of your local area to find the best scenes and natural features for your photography.
 The problem I find is that the nature in my region isn’t that
impressive compared to other parts of the country, and indeed the rest
of the world… at least not at first glance.
The problem I find is that the nature in my region isn’t that
impressive compared to other parts of the country, and indeed the rest
of the world… at least not at first glance.
But if you take the time to explore and really look at everything around you, you’ll always find beautiful places to shoot, even in the most ordinary landscapes.
 I explore my surroundings whenever I can. I travel by bike or car,
constantly searching for a good location. I even use Google and maps to
find interesting sites and locations.
I explore my surroundings whenever I can. I travel by bike or car,
constantly searching for a good location. I even use Google and maps to
find interesting sites and locations.
Not far from my city I find hundreds of small lakes, seascapes, mighty forests and lots of farmland. The trick is to understand that you don’t need a vast and dramatic landscape to take interesting photos outdoors.
 A simple field that includes a lone tree or a person will make a great
landscape photo as long as you frame it with a little thought. You can
even take beautiful landscape shots in city parks if you compose your
shot carefully.
A simple field that includes a lone tree or a person will make a great
landscape photo as long as you frame it with a little thought. You can
even take beautiful landscape shots in city parks if you compose your
shot carefully.
 So wherever you live, and whatever your motivation for wanting to take
landscape photos, the first step is to get out and explore your
surroundings. If you don’t do this, you’ll be missing out on so many
amazing photo opportunities!
So wherever you live, and whatever your motivation for wanting to take
landscape photos, the first step is to get out and explore your
surroundings. If you don’t do this, you’ll be missing out on so many
amazing photo opportunities!

One of the best ways to make a landscape photo more interesting is to
include a main subject to act as a focal point within the scene. This
is especially true with landscapes that don’t have any dominating
features, such as the plain field in the photo above.A focal point provides the viewer with a place for their eye to rest
once they’ve looked around the rest of the scene. It helps to make the
picture more complete and more satisfying to look at.
 You could use anything as a focal point, as long as it stands out and
catches the viewer’s attention. Common objects to use as a focal point
in landscape photos are trees, buildings and people, but you could use any object you want.
You could use anything as a focal point, as long as it stands out and
catches the viewer’s attention. Common objects to use as a focal point
in landscape photos are trees, buildings and people, but you could use any object you want.
 In the photo above, the small island serves as a focal point. If I’d
composed the shot a bit to the left or a bit to the right, my photo
would have only contained sea and sky. Without the focal point it
wouldn’t hold the viewer’s interest for long.But the island creates a point in the scene that immediately draws
your eye into the photo. It also adds a storytelling element that might
make the viewer wonder what’s on that island and how they would get
there.
In the photo above, the small island serves as a focal point. If I’d
composed the shot a bit to the left or a bit to the right, my photo
would have only contained sea and sky. Without the focal point it
wouldn’t hold the viewer’s interest for long.But the island creates a point in the scene that immediately draws
your eye into the photo. It also adds a storytelling element that might
make the viewer wonder what’s on that island and how they would get
there.
 Many of my landscape photos are taken in a flat field of grass or
crops, or on a small hill. But by carefully composing the shot and
including an interesting focal point, I manage to make something out of
the most ordinary outdoor scenes.
Many of my landscape photos are taken in a flat field of grass or
crops, or on a small hill. But by carefully composing the shot and
including an interesting focal point, I manage to make something out of
the most ordinary outdoor scenes.
 If you take a few minutes to explore the location, it’s likely that you’ll find a better vantage point that will allow you to create a cleaner and more minimal composition. This allows you to place more emphasis on your main subject within the landscape.
 Composition
is very important in landscape photography, and you shouldn’t rush this
step. Once you find a scene that you’d like to photograph and you’ve
chosen your main subject or point of interest, take a few minutes to
find the best viewpoint to shoot from.
Composition
is very important in landscape photography, and you shouldn’t rush this
step. Once you find a scene that you’d like to photograph and you’ve
chosen your main subject or point of interest, take a few minutes to
find the best viewpoint to shoot from.
 Poor composition can lead to weak photos that no one remembers. Keeping
the composition simple so that your main subject is clearly visible is
the best way to create powerful landscape photos with a strong focal
point.
Poor composition can lead to weak photos that no one remembers. Keeping
the composition simple so that your main subject is clearly visible is
the best way to create powerful landscape photos with a strong focal
point.
 Try to compose your shot to eliminate any unwanted parts of the scene.
Get closer if necessary, so that distracting elements don’t appear in
the frame.
Try to compose your shot to eliminate any unwanted parts of the scene.
Get closer if necessary, so that distracting elements don’t appear in
the frame.
 Changing your shooting angle can make a big difference to how your photo turns out. Shooting from a low angle allows
you to get more plain sky behind your subject which is great for
creating minimal compositions where your main subject really stands out.
Changing your shooting angle can make a big difference to how your photo turns out. Shooting from a low angle allows
you to get more plain sky behind your subject which is great for
creating minimal compositions where your main subject really stands out.
 Look out for pretty flowers, colorful leaves and small insects. Keep your eyes peeled for textures, patterns and color combinations that will add visual appeal to your photo collection. Don’t be afraid to fill the entire frame with your subject.
 As you’re walking through a landscape don’t just look straight ahead into the distance. Explore every part of the location.
 Look down at the ground to see what’s there, look up into a tree canopy
as the light shines through, or get close to the water’s surface of a
lake to capture the texture of the ripples.
Look down at the ground to see what’s there, look up into a tree canopy
as the light shines through, or get close to the water’s surface of a
lake to capture the texture of the ripples.
 Including close-up pictures of nature along with your wide angle
landscape shots helps to tell a more complete story and adds variety to
your photo feed.
Including close-up pictures of nature along with your wide angle
landscape shots helps to tell a more complete story and adds variety to
your photo feed.
 I love to shoot on a really cloudy day, so that the clouds create a big
dreamy backdrop. Shooting in these conditions is more likely to make
your photos stand out from the crowd.
I love to shoot on a really cloudy day, so that the clouds create a big
dreamy backdrop. Shooting in these conditions is more likely to make
your photos stand out from the crowd.
 Big dark clouds add amazing drama to a scene, so if you like to create
dramatic and moody photos, get out with your iPhone camera when the sky
is “angry!”
Big dark clouds add amazing drama to a scene, so if you like to create
dramatic and moody photos, get out with your iPhone camera when the sky
is “angry!”
 With regards to light, the most beautiful time of day to shoot is around the golden hours of sunrise and sunset. The colors will be warm and vibrant, and the low position of the sun creates wonderful long shadows that add visual interest to the foreground of your scene.
Shooting into the sun will turn your subjects into silhouettes, whereas shooting with the sun behind you will cast wonderful warm light onto the scene.
 Shooting with the sun behind you makes the sun work like a huge
flashlight, lighting up the whole area you’re shooting. Almost anything
looks beautiful in really good light, including these plastic wrapped
bales!
Shooting with the sun behind you makes the sun work like a huge
flashlight, lighting up the whole area you’re shooting. Almost anything
looks beautiful in really good light, including these plastic wrapped
bales!
With a person as your main point of interest, it becomes easier to build your composition around them. Just place the person where you want them in the scene, then experiment with your shooting angle and framing until the composition looks good.
 Ask a friend to join you to act as your subject, or find a group of
people that want to shoot the same things as you. Alternatively, mount
your iPhone on a small tripod such as the Joby GorillaPod so that you can appear in the photo yourself.
Ask a friend to join you to act as your subject, or find a group of
people that want to shoot the same things as you. Alternatively, mount
your iPhone on a small tripod such as the Joby GorillaPod so that you can appear in the photo yourself.
When using yourself as the subject you can either set a self-timer so that you have time to run into the shot, or invest in a remote shutter release such as the Muku Shuttr so that you can trigger the shutter button when you’re ready.
 Whether your background is a simple field of grass or a more scenic
view, including a human presence creates an extra dimension that
inanimate objects can’t generate.
Whether your background is a simple field of grass or a more scenic
view, including a human presence creates an extra dimension that
inanimate objects can’t generate.
Depending on how you pose the person and frame the shot, adding people to your landscape photos can create a wonderful sense of mystery and intrigue
 Photographing the person from behind so you can’t see their face is a
perfect way to achieve this. Creating silhouettes is another method
that you could use.Creativity can often be sparked when you meet up and shoot with other
likeminded people. Experiment with different ways to include the person
within the landscape. Have fun and see if you can make your photo a bit
different by adding a unique or humorous element to the shot.
Photographing the person from behind so you can’t see their face is a
perfect way to achieve this. Creating silhouettes is another method
that you could use.Creativity can often be sparked when you meet up and shoot with other
likeminded people. Experiment with different ways to include the person
within the landscape. Have fun and see if you can make your photo a bit
different by adding a unique or humorous element to the shot.
 Try to think about what your subject should wear so they stand out well
against the background. Dark clothes often work best as
they contrast well against most colors that you find out in nature.
Try to think about what your subject should wear so they stand out well
against the background. Dark clothes often work best as
they contrast well against most colors that you find out in nature.

If the landscape is plain or dull, try using bright and vibrant clothing for an extra pop of color. Red works really well in most situations.
 You can choose just about any object to spice up your picture.
Items such as umbrellas, chairs, flowers and frames are my
favorite props to work with.
You can choose just about any object to spice up your picture.
Items such as umbrellas, chairs, flowers and frames are my
favorite props to work with.
 Look around your home and find any colored object that won’t be too
difficult to carry around with you. And yes, I do carry that red chair
with me on landscape shoots!
Look around your home and find any colored object that won’t be too
difficult to carry around with you. And yes, I do carry that red chair
with me on landscape shoots!
Don’t be afraid of what people might think. Armed with your props you’re going to be the one getting the best shots.
 Be imaginative in how you use your props within the scene. Here I used
a globe in the foreground, while I positioned myself much further away.
Playing around with scale is a great way to create more intriguing
shots.
Be imaginative in how you use your props within the scene. Here I used
a globe in the foreground, while I positioned myself much further away.
Playing around with scale is a great way to create more intriguing
shots.

I like to have my props colorful for extra visibility and visual appeal. One of my favorite color combinations is red and green.
You can use props that aren’t colorful, but you should make sure they contrast against the background. For example, a black umbrella against a black wall won’t do the trick, but black on green will work!
 Interesting buildings are great for including in your landscape photos.
Whether the building is old or new, it’ll surely add an extra dimension
and focal point to an otherwise empty landscape.
Interesting buildings are great for including in your landscape photos.
Whether the building is old or new, it’ll surely add an extra dimension
and focal point to an otherwise empty landscape.
 Old abandoned buildings are worth capturing up close too. Wooden
objects often add a beautiful texture and history to your photography.
The muted colors of wood are great for when you want to add a vintage
feel to your photos.
Old abandoned buildings are worth capturing up close too. Wooden
objects often add a beautiful texture and history to your photography.
The muted colors of wood are great for when you want to add a vintage
feel to your photos.
 If you’re shooting around water, look out for a beaten up wooden jetty that will be the perfect match against nature’s colors.Boats also make great subjects to include in your landscapes. I love
their strong shape and form, and their wonderful wooden textures.
If you’re shooting around water, look out for a beaten up wooden jetty that will be the perfect match against nature’s colors.Boats also make great subjects to include in your landscapes. I love
their strong shape and form, and their wonderful wooden textures.
 Other man-made objects to look out for are railways, power lines,
roads, bridges, gates, old benches, or any objects that people leave
behind. Anything man-made can be a really great addition to your
composition and will add soul to your landscape photography.
Other man-made objects to look out for are railways, power lines,
roads, bridges, gates, old benches, or any objects that people leave
behind. Anything man-made can be a really great addition to your
composition and will add soul to your landscape photography.
 Just imagine a cold and barren winter landscape
compared to a colorful and lush summer scene. Both have their own
charm, and both can be the most beautiful thing you’ve ever laid your
eyes on.
Just imagine a cold and barren winter landscape
compared to a colorful and lush summer scene. Both have their own
charm, and both can be the most beautiful thing you’ve ever laid your
eyes on.
 I love to return to the same place every new season to see how it’s
changed. Even though I’m shooting in the same spot I can take a
completely different photo each time.
I love to return to the same place every new season to see how it’s
changed. Even though I’m shooting in the same spot I can take a
completely different photo each time.
 The photos above and below are of my favorite tree that I like to visit
throughout the year. I took both photos from the same viewpoint, but
they have a completely different look and feel due to the time of year
that I shot them.
The photos above and below are of my favorite tree that I like to visit
throughout the year. I took both photos from the same viewpoint, but
they have a completely different look and feel due to the time of year
that I shot them.
 Spring is a wonderful time to get out into the landscape and shoot. When
the first flowers pop out of the ground and the trees start to blossom,
the landscape will be filled with delicate beauty.
Spring is a wonderful time to get out into the landscape and shoot. When
the first flowers pop out of the ground and the trees start to blossom,
the landscape will be filled with delicate beauty.
 And don’t forget to shoot during fall. The colors at this time of year
will be stunning as the leaves begin to turn all different shades of
orange and red.
And don’t forget to shoot during fall. The colors at this time of year
will be stunning as the leaves begin to turn all different shades of
orange and red.

 Luckily there are some simple techniques that you can use to
show depth in your landscape photos. Composing your shot with elements
at different distances from the camera is the key to creating a sense of
depth.
Luckily there are some simple techniques that you can use to
show depth in your landscape photos. Composing your shot with elements
at different distances from the camera is the key to creating a sense of
depth.
The aim is to have objects in the foreground as well as in the distance. You could use rocks, plants, flowers, people, a tree trunk, or just about anything else that’s on the ground to add foreground interest to your landscapes scene.
 Your eyes will naturally move from the objects in the foreground to
those in the distance and back again. This tells your brain that there’s
distance between each element, and therefore depth. Shoot from a low
angle if you’re struggling to get the foreground objects into your
frame.
Your eyes will naturally move from the objects in the foreground to
those in the distance and back again. This tells your brain that there’s
distance between each element, and therefore depth. Shoot from a low
angle if you’re struggling to get the foreground objects into your
frame.
 If there’s nothing on the ground to act as foreground interest, maybe
there are some overhanging tree branches that you could stand under and
include along the top of your shot. Just make sure they don’t cover your
main subject in the distance.
If there’s nothing on the ground to act as foreground interest, maybe
there are some overhanging tree branches that you could stand under and
include along the top of your shot. Just make sure they don’t cover your
main subject in the distance.
 Another popular technique for creating depth is to use leading lines in your composition. Leading lines are simply lines that lead from one part of the scene to another.
 By starting the line in the foreground the viewer’s eye will naturally
follow the line, taking them deeper into the photo. This is also a means
of including foreground interest.
By starting the line in the foreground the viewer’s eye will naturally
follow the line, taking them deeper into the photo. This is also a means
of including foreground interest.
 If you can position your main subject at the end of the leading line
or somewhere along it, this is even better. The line will lead the eye
directly to the intended point of interest, creating an extremely
powerful composition.
If you can position your main subject at the end of the leading line
or somewhere along it, this is even better. The line will lead the eye
directly to the intended point of interest, creating an extremely
powerful composition.
An added benefit of using parallel leading lines such as a jetty, road, bridge, railway track, or even parallel rows of trees, is that you can create wonderful symmetrical compositions as long as you position the lines perfectly central.
 No matter what type of landscape you’re shooting in, always work
towards finding some way to create a sense of depth. This will make your
photo more engaging, and ultimately more memorable to the people who
look at them.So now you know the secrets to great landscape photography, get out
there and explore with your iPhone to see what amazing landscape photos
you can create!
No matter what type of landscape you’re shooting in, always work
towards finding some way to create a sense of depth. This will make your
photo more engaging, and ultimately more memorable to the people who
look at them.So now you know the secrets to great landscape photography, get out
there and explore with your iPhone to see what amazing landscape photos
you can create!
Note Some Pictures are Contributed by my Swedish friend Carl Johan Johansson
.
1. Explore Your Region
The most obvious thing you need for landscape photography is a landscape! I often hear people say that they can’t shoot landscape photos because they don’t live in a place with amazing mountains, crystal clear lakes, beautiful waterfalls, etc.But you don’t need to live in areas of stunning natural beauty to take great landscape photos. No matter where you are, if you take the time to explore your region you’ll find some excellent opportunities for taking amazing landscape photos with your iPhone.
Even if you live in the countryside, you’ll probably need to do some exploring of your local area to find the best scenes and natural features for your photography.
But if you take the time to explore and really look at everything around you, you’ll always find beautiful places to shoot, even in the most ordinary landscapes.
Not far from my city I find hundreds of small lakes, seascapes, mighty forests and lots of farmland. The trick is to understand that you don’t need a vast and dramatic landscape to take interesting photos outdoors.
2. Include A Focal Point
A landscape photo without a main subject or focal point rarely turns out well. The problem with shooting landscapes is that they often look amazing in real life, but when you capture them in a photo the image doesn’t look that impressive.3. Create Simple Compositions
When you first start shooting landscapes, you might end up with very busy compositions. Landscapes can include a lot of different features, both natural and man-made, and when you have too many competing elements it can confuse the viewer.4. Capture The Smaller Details
Rather than always shooting wide open landscape scenes, mix it up a bit by focusing on interesting features of the environment. When you’re out exploring, try to notice the smaller details found in nature and capture them with your iPhone.5. Shoot In Interesting Light & Weather
Light and weather conditions are crucial for good landscape photography. Bad weather is often better for shooting landscapes as it creates more interesting light and dramatic skies.Shooting into the sun will turn your subjects into silhouettes, whereas shooting with the sun behind you will cast wonderful warm light onto the scene.
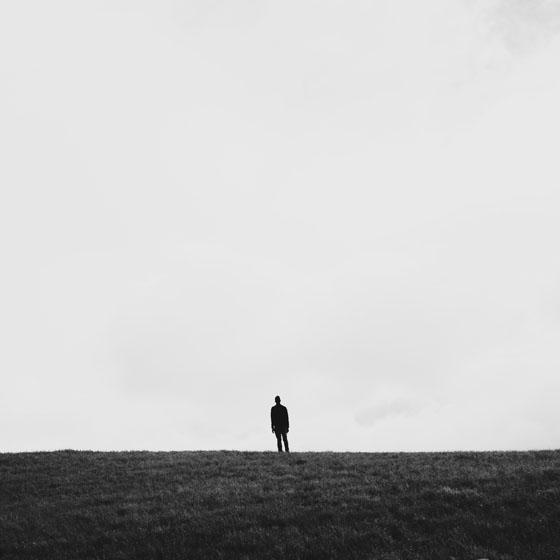
6. Include People In The Scene
One of my favorite ways to make a landscape photo more interesting is to include a person in the scene. The person will act as a strong focal point, especially in big empty landscapes.With a person as your main point of interest, it becomes easier to build your composition around them. Just place the person where you want them in the scene, then experiment with your shooting angle and framing until the composition looks good.
When using yourself as the subject you can either set a self-timer so that you have time to run into the shot, or invest in a remote shutter release such as the Muku Shuttr so that you can trigger the shutter button when you’re ready.
Depending on how you pose the person and frame the shot, adding people to your landscape photos can create a wonderful sense of mystery and intrigue
If the landscape is plain or dull, try using bright and vibrant clothing for an extra pop of color. Red works really well in most situations.
7. Use Props To Create Interest
Adding a simple prop to a landscape can add so much to the image. It has the same purpose as including a person, in that it creates a strong focal point, but a prop gives you more creative options.Don’t be afraid of what people might think. Armed with your props you’re going to be the one getting the best shots.
I like to have my props colorful for extra visibility and visual appeal. One of my favorite color combinations is red and green.
You can use props that aren’t colorful, but you should make sure they contrast against the background. For example, a black umbrella against a black wall won’t do the trick, but black on green will work!
8. Photograph Man-Made Objects
It’s not always convenient to include a person in your photo or to take an interesting prop out with you. However, you’ll often stumble upon man-made objects out in the landscape which can add a nice contrast to the natural surroundings.9. Shoot In Different Seasons
The change of seasons offers new photo opportunities every few months, even if you’ve already shot the place in question before. Make sure you get out into the landscape during each season to capture the variations in vegetation, weather and light.10. Create A Sense Of Depth
Finally, taking everything into account that you’ve learned so far, it’s important to always do what you can to create a sense of depth in your landscape photos. Without this your images will look “flat” and won’t convey the scale and distance that you saw with your own eyes.The aim is to have objects in the foreground as well as in the distance. You could use rocks, plants, flowers, people, a tree trunk, or just about anything else that’s on the ground to add foreground interest to your landscapes scene.
An added benefit of using parallel leading lines such as a jetty, road, bridge, railway track, or even parallel rows of trees, is that you can create wonderful symmetrical compositions as long as you position the lines perfectly central.
Note Some Pictures are Contributed by my Swedish friend Carl Johan Johansson
.


0 comments:
Post a Comment